
This write-up is a work in progress.
Overview
Over the past few months, I've built the back-end of this content management system… Twice.
The first version was a stateless JSON API secured with JWTs and paired with a JavaScript single-page front-end, with persistence handled by Hibernate. After building out a portion of the API, I realized there was no justifiable reason to have two separate code bases, dependency trees, and mental models of the application for this use-case.
The current version is still running a RESTful Spring Boot API. Yet, instead of a decoupled architecture typically used for serving different types of clients (e.g., web, mobile, or refrigerator), I decided on a more cohesive MVC architecture, since this is only ever going to be a browser-based web app anyway. Using a lighter stack of Thymeleaf, HTMX, Markdown, and Spring’s JDBC Client is more transparent and simple (as much as Spring can be anyway) than a heavier ORM and a full JavaScript framework. It is also secured with sessions and CSRF tokens for form input. This all leads to less complexity and better maintainability.
Overall, the project is ongoing and meant as a learning and practice exercise. I think it will keep me motivated to continue writing and documenting the rest of my experiences. The biggest lesson early on was how important the planning and requirements-gathering phases of the SDLC are, and that neither of the above architectures is better than the other, just have different use cases in different projects.
What It Does
With that lesson in mind, here’s what the site does at a high level. It is a modern blogging platform that behaves like a single-page application (SPA) without the need for two separate code bases. It helps me write blog posts and portfolio project explanations through a dynamic form with a simple markup language called Markdown. Visitors can browse my blog posts and portfolio projects, filter by category, and engage in the comment section after they’ve registered.
Registration & Auth

A standard username and password, along with an email address, are used to verify the account. I did this to prevent spam in the comments and to build a custom registration flow for myself. I could have integrated something like Disqus to handle comments and auth, but that requires a monthly fee if you don't want ads, and I really don't want ads. I'm sure other free tools function well for this use, but I am building this site to be something I own completely.
Demo of registration flow:
Comments
The comment section is my way of interacting with visitors. Anyone can read a post’s comments, but actually commenting requires a quick registration and a one-time 6 digit code sent to their email to verify they’re a real person, which I think will help prevent spam.
I modeled the comment section to function similarly to how Reddit works. Top-level comments are shown first if requested, nested replies are also not loaded until the user asks for them (lazy-loading). This is to reduce the initial load size of the page and comment section for performance. Replies are nested within top-level comments or other replies. Each comment shows who posted it and how long ago it was created or last updated, with edit/delete options for the commenter or an Admin. The delete option can either fully delete the comment if it has no replies, otherwise the comment is soft-deleted and the comment text is changed to “deleted”. The comment itself stays as a placeholder for its replies. Try it in real-time here (after registration of course).
Admin (My Use-Cases)
The rest of the application’s use-cases are gated behind the admin (my) role. Those uses are: creating posts, saving and reading posts in progress (they are private until published), creating and modifying categories, and moderating comments.
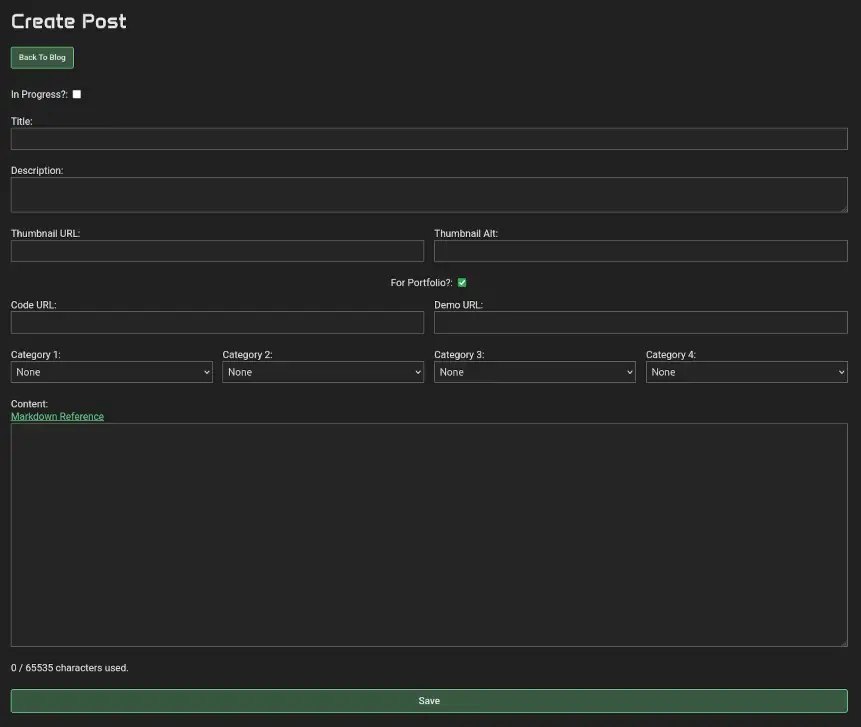
Posts are written in Markdown which is input into a dynamic HTML form that can change fields depending on if it’s a blog post or a portfolio project write-up. I thought about adding an editor, but didn’t think I would use it since it’s faster to just use the keyboard to write out the Markdown manually. Saving the form brings me directly to the rendered HTML for an easy view.
Input form:
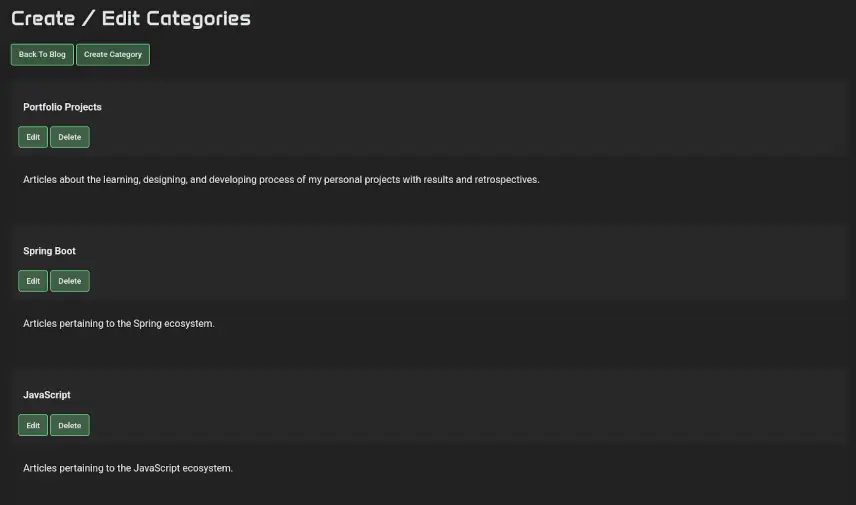
Each post or project can have up to 5 categories related to it. Creating and editing categories is done in its own page that lists each category and provides buttons to create, edit, and delete them. Clicking create opens a form for the category name and description. The edit button on each listed category opens a populated form with the categories details.
Category Modification Page:
Only an Admin (me) or the comment’s author has the ability to edit or delete a comment. Currently, I just check comments periodically, I plan on adding email notifications for new comments in the future so I can reply and moderate promptly.
How It's Built
These sections detail the various technical aspects of the application without going too far in depth, as they are quite long as it is.
Planning & Design
My plan was more lightweight on paper than it should have been (which is a big reason for this website to exist, to get better at that), but it was planned much more deliberately than my first attempt, which I was able to use as a reference point for what to keep or cut.
I created an Entity Relation Diagram (ERD) to work out the data model early on:

From there, I wrote out a short list of requirements and technical choices and used a Kanban board to keep that scope in check and utilized test driven development to maintain confidence in my SQL queries and service methods.
Before I even began writing code, I decided on this list of requirements:
- Data: MariaDB, JDBC Client (No ORM), Normalized Schema (3NF+)
- Language/Framework(s): Spring Boot with Security and MVC modules, JDBC Client, Jakarta Validation, CommonMark (Markdown to HTML parsing), JUnit, Mockito, TestContainers
- Client Interactivity: Thymeleaf Templates enhanced with HTMX for AJAX and partial page updates, custom JS + CSS
- Security: Spring Security with form based login, Sessions, CSRF tokens for form input
- Architecture and Methodology: Layered Monolith & Agile Kanban/TDD
- Infrastructure: Spring MVC’s Embedded Tomcat running on AWS within a Single small EC2 instance, S3 for static assets, with CloudFront for static file CDN and a reverse proxy with WAF for Rate Limiting
Data Layer
For storage, I chose MariaDB because it's fast and lightweight, and similar to MySQL, which I've used quite a bit. My relational schema, as shown in the ERD above, consists of six tables: users, verification, blog entries, categories, post_categories, and comments. The schema is arguably normalized to 3rd normal form because no field determines another, with one exception in the blog_entries table, slug is derived from title. In the application layer, slug cannot be edited separately from title, so they will never fall out of sync.
The users table holds the core account info. The username, email, and date_created are self-explanatory, password holds a 72-character limit which is bcrypt’s fixed output length, role holds an enum of either ADMIN or USER to keep authorization simple, and is_active tracks if the account has completed email verification.
Users Table
CREATE TABLE `users` (
     `id` int NOT NULL AUTO_INCREMENT,
     `username` varchar(64) NOT NULL,
     `password` varchar(72) NOT NULL,
     `date_created` date DEFAULT curdate(),
     `is_active` tinyint(1) DEFAULT 0,
     `role` enum('ADMIN','USER') NOT NULL,
     `email` varchar(255) NOT NULL,
     PRIMARY KEY (`id`),
     UNIQUE KEY `Users_UNIQUE` (`username`),
     UNIQUE KEY `users_email_unique` (`email`)
);
verification is its own table and a one-to-one relation to user by user_id. This is because I don’t need to keep this data around after the user has verified their email. The otp field holds a string with a 72 character limit to allow for bcrypt. The expiry field is set in the application to 15 minutes after the user successfully registers and resetCounter handles rate-limits on resending the OTP.
Verification Table
CREATE TABLE `verification` (
    `user_id` int NOT NULL,
    `otp` varchar(72) NOT NULL,
    `expiry` DATETIME NOT NULL,
    `resetCounter` int NOT NULL DEFAULT 0,
    PRIMARY KEY (`user_id`),
    KEY `verification_tokens_users_FK` (`user_id`),
    CONSTRAINT `verification_tokens_users_FK` FOREIGN KEY (`user_id`) REFERENCES `users` (`id`)
);
The blog_entries table holds both blog and portfolio articles as denoted by the is_portfolio boolean. The content text field holds the Markdown of the article, I used the text type because it can hold an entire article in a single field (65535 bytes or 64KB). That simplifies storage as I wouldn’t need to order the paragraphs or whatever was used to separate the article into smaller chunks. The title and slug fields technically hold the same thing, but are formatted differently. slug is derived from title (set in the application so it cannot get out of sync) and used in the URI to identify the post in the address bar or external links in a human readable format. Since they should not contain spaces or capital letters like the title can, I chose to format them prior to storage. The description field is used in the dashboard for the article cards and meta description tag in the post's webpage to describe the article if it comes up in a web search. The in_progress boolean is used when saving an unfinished article, visitors cannot view these unless they have an admin role. Everything else is pretty straight-forward, holding URLs for images and links, and dates for created_at and updated_at.
Blog Entries Table
CREATE TABLE `blog_entries` (
    `id` int NOT NULL AUTO_INCREMENT,
    `content` text NOT NULL,
    `title` varchar(255) NOT NULL,
    `slug` varchar(255) NOT NULL,
    `description` varchar(500) NOT NULL,
    `created_at` datetime DEFAULT current_timestamp(),
    `updated_at` datetime DEFAULT NULL ON UPDATE current_timestamp(),
    `thumbnail_url` varchar(255) NOT NULL,
    `thumbnail_alt` varchar(255) NOT NULL,
    `in_progress` tinyint(1) NOT NULL,
    `code_url` varchar(255) DEFAULT NULL,
    `demo_url` varchar(255) DEFAULT NULL,
    `is_portfolio` tinyint(1) NOT NULL,
    PRIMARY KEY (`id`)
);
The categories table and its join table posts_categories, hold the categories that allow filtering and the relate them to a blog entry or post. The category_name and description provide details on the specific category. In the join table, post_id is the foreign key to blog_entries primary key id and category_id is the foreign key connecting the categories table back to a post. categories uses a unique index on category_name for faster look ups since they need to be fetched when the blog dashboard loads as well as each post’s page.
Categories Table
CREATE TABLE `categories` (
    `id` int NOT NULL AUTO_INCREMENT,
    `category_name` varchar(100) NOT NULL,
    `description` varchar(255) NOT NULL,
    PRIMARY KEY (`id`),
    UNIQUE KEY `Categories_UNIQUE` (`category_name`)
);
Categories Join Table
CREATE TABLE `posts_categories` (
    `post_id` int NOT NULL,
    `category_id` int NOT NULL,
    UNIQUE KEY `post_id` (`post_id`,`category_id`),
    KEY `Posts_Categories_Categories_FK` (`category_id`),
    KEY `Posts_Categories_Blog_Entry_FK` (`post_id`),
    CONSTRAINT `Posts_Categories_Blog_Entry_FK` FOREIGN KEY (`post_id`) REFERENCES `blog_entries` (`id`) ON DELETE CASCADE,
    CONSTRAINT `Posts_Categories_Categories_FK` FOREIGN KEY (`category_id`) REFERENCES `categories` (`id`) ON DELETE CASCADE
);
The comments table stores the state and content of each comment. content is limited to 500 characters to allow for slightly longer comments. is_deleted is the state when the comment is “soft-deleted” but needs to stick around for a placeholder to reply comments. The table is self-referencing to the parent_comment_id field to allow for nested replies. The author_id foreign key references the users table to allow the username to be retrieved and the post_id foreign key references the blog_entry where the comment is found.
Comments Table
CREATE TABLE `comments` (
    `id` int NOT NULL AUTO_INCREMENT,
    `content` varchar(500) NOT NULL,
    `created_at` datetime NOT NULL DEFAULT current_timestamp(),
    `updated_at` datetime DEFAULT NULL ON UPDATE current_timestamp(),
    `parent_comment_id` int DEFAULT NULL,
    `author_id` int NOT NULL,
    `post_id` int NOT NULL,
    `is_deleted` tinyint(1) NOT NULL DEFAULT 0,
    PRIMARY KEY (`id`),
    KEY `Comments_Comments_FK` (`parent_comment_id`),
    KEY `Comments_Users_FK` (`author_id`),
    KEY `Comments_Blog_Entries_FK` (`post_id`),
    CONSTRAINT `Comments_Blog_Entries_FK` FOREIGN KEY (`post_id`) REFERENCES `blog_entries` (`id`) ON DELETE CASCADE,
    CONSTRAINT `Comments_Comments_FK` FOREIGN KEY (`parent_comment_id`) REFERENCES `comments` (`id`) ON DELETE CASCADE,
    CONSTRAINT `comments_users_FK` FOREIGN KEY (`author_id`) REFERENCES `users` (`id`)
);
Application Layer
Application Architecture
One requirement of mine was to use a layered monolith type of architecture, built using Spring Boot's MVC and Security modules. Within that, I followed the standard Controller, Service, DAO structure, organized by feature rather than layer, with each layer living together in the same package. The file organization has no bearing on what a component can depend on, though. CommentService, for example, is injected with UserDao from the user package since it needs it to validate comment ownership.
Some things are easier to draw than to explain, here's the overall shape of it:
Component Diagram With Request/Response Flow

Query & Object Mapping
Another of my self-imposed requirements going in was to avoid an ORM, and Spring's JDBC Client fills that role nicely. It handles interactions between the application and database layers without the unexpected N+1 issues or overhead that an ORM requires. The trade-off is more code to write, but having transparent control over my queries is more than worth it. Mapping query results to Java objects is also simple; it just requires populating an object's constructor, which keeps everything clean and maintainable.
The JDBC Client query for getting parent comments and counting their direct replies with the extractor method populating the Comment object(s):
List<Comment> getParentCommentsByPostId(int postId) {
    return jdbc.sql(
        "SELECT c.id, c.parent_comment_id, c.content, c.created_at, c.updated_at, c.post_id, " +
            "c.author_id, c.is_deleted, u.username, COALESCE(r.reply_count, 0) AS reply_count " +
        "FROM comments c " +
        "JOIN users u ON c.author_id = u.id " +
        "LEFT JOIN ( " +
            "SELECT parent_comment_id, COUNT(*) AS reply_count " +
            "FROM comments sub_c " +
            "WHERE sub_c.parent_comment_id IS NOT NULL AND sub_c.post_id = :postId " +
            "GROUP BY sub_c.parent_comment_id) r " +
            "ON r.parent_comment_id = c.id " +
        "WHERE c.post_id = :postId AND c.parent_comment_id IS NULL " +
        "ORDER BY c.created_at desc")
            .param("postId", postId)
            .query((rs, _) -> this.commentExtractor(rs))
            .list();
}

Comment commentExtractor(ResultSet rs) throws SQLException {
    AuthorDto authorDto = new AuthorDto(
        rs.getInt("author_id"), rs.getString("username")
    );
    Timestamp updatedAt = rs.getTimestamp("updated_at");
    return new Comment(
        rs.getInt("id"),
        rs.getString("content"),
        rs.getTimestamp("created_at").toInstant(),
        updatedAt != null ? updatedAt.toInstant() : null,
        rs.getInt("post_id"),
        rs.getObject("parent_comment_id", Integer.class),
        authorDto,
        rs.getInt("reply_count"),
        rs.getBoolean("is_deleted")
    );
}
Since replies are loaded only when the user requests them, I needed to get a reply count so it’s apparent whether the comment has replies or not. The subquery here handles that by counting the child rows (replies grouped by parent_comment_id), then joining the count back into the result by matching comment.id.
The getObject("parent_comment_id", Integer.class) call in the extractor method is used to maintain a NULL value to qualify the comment as top-level or reply in the template, and so it does not need a separate extractor.
All of the DAOs are constructed similarly.
Services, DTOs, & Error Handling
Each feature's service layer contains most of the application’s logic and is where the DAO and Controller meet. Data transfer objects (DTOs) are built here, and user input and other data are managed and validated directly in the DTO or the Service, depending on the purpose (input in DTO vs various auth and error handling in Service).
The Service layer has validations that are used to check if the requested comment exists and the user actually has ownership of a comment before modifying it in the database.
For example, in the updateComment() method, the flow is:
- Grab the username from the authentication context with
getUsername(). - Call for the
commentby itsidand waits for anOptional<Comment>value. - If the optional is populated, it continues down the method; if not, it throws my custom exception
BlogEntryException. - Then, the
validateAuthor(username, comment.id)method checks if the username was received fromgetUsername(). If it wasn’t null, the database is queried to get theuser.idto check against the comment’sauthorIdfield. - After everything passes, the comment is attempted to be updated; if it cannot be updated for whatever reason, the exception is thrown and a message shown in the UI.
Examples of updateComment(), getUsername(), & validateAuthor():
Comment updateComment(CreateCommentDto dto) {
    String username = getUsername();
    Integer commentId = dto.getCommentId();
    Comment commentToEdit = commentDao.getCommentById(commentId)
            .orElseThrow(() -> new BlogEntryException("Comment not found with id: " + commentId));

    this.validateAuthor(username, commentToEdit.getAuthor().id());
    commentToEdit.setContent(dto.content);

    int isUpdated = commentDao.update(commentToEdit.getId(), commentToEdit.getContent());

    if (isUpdated == 1) {
        return commentToEdit;
    } else  {
        throw new BlogEntryException("Comment not updated.");
    }
}

String getUsername() {
    Authentication auth = SecurityContextHolder.getContext().getAuthentication();
    if (auth == null || auth instanceof AnonymousAuthenticationToken) {
        return null;
    }
    return auth.getName();
}

boolean validateAuthor(String username, Integer commentAuthorId) {
    if (username == null) throw new BlogEntryException("Please login to comment.");

    AuthorDto author = appUserDao.getUserIdByUsername(username)
            .orElseThrow(() -> new BlogEntryException("Username not found!"));

    if (!commentAuthorId.equals(author.id())) {
        throw new BlogEntryException("Not the author of this comment.");
    }
    return true;
}
BlogEntryException is caught in a GlobalExceptionHandler class that sends a template (or fragment swapped into a dedicated error field if the request was from HTMX) response populated with an error message.
Exception Handler Example:
@ControllerAdvice
public class GlobalExceptionHandler {
    @ExceptionHandler(BlogEntryException.class)
    public String handleError(BlogEntryException ex, Model model, HtmxRequest request, HtmxResponse response) {
        String message = ex.getMessage();

        model.addAttribute("errorMsg", message);
        model.addAttribute("title", "Error!");

        if (!request.isHtmxRequest()) {
            return "error/error-components";
        }

        response.setRetarget("#error-field");
        return "error/error-components::error-field";
    }
}
The input validation built into the DTO is using the jakarta.validation package. It is useful for standard input validations such as the field being blank, size constraints, regex patterns, etc... There are also a few custom validators here that I created for my specific use, these are:
@MatchingPassword: Checks thepasswordagainst theconfirmPasswordfield. Is annotated on the type itself so it can access both relevant fields of the DTO.@UniqueUsername: Checks the database for an existingusernameequal to the input.@UniqueEmail: Checks the database for an existingemailequal to the input.
Example of DTO input validators
@MatchingPassword
public class UserRegistrationDto {
    @NotBlank
    @Size(min = 4, max = 64)
    @UniqueUsername
    private String username;

    @NotBlank
    @Size(max = 255)
    @Email
    @UniqueEmail
    private String email;

    @NotBlank
    @Size(min = 8, max = 64)
    @Pattern(regexp = "^(?=.*\\d)(?=.*[a-z])(?=.*[A-Z])(?!.+\\s).+$",
            message = "Must have one of each: number, uppercase, lowercase letters. No spaces allowed.")
    @Pattern(regexp = "^(?=.*[^a-zA-Z0-9]).+$",
            message = "Must have one non-alphanumeric character.")
    private String password;

    @NotBlank
    private String confirmPassword;

    public UserRegistrationDto() {}

    // Getters and Setters removed...
}
HTTP Controllers
Now, where the outside world meets the application, the HTTP controllers. Since I'm using Spring MVC, HTTP responses return HTML. These responses can vary depending on the origin of the request. If the request comes from outside the application (e.g., an external link, or direct URL navigation) a full page is rendered and sent to the browser. On the other hand, if the request is from a button or link within the application, HTMX requests a partial page that is swapped with what it interacted with.
Here is an example of the /blog endpoint with methods it depends on to respond with the blog dashboard showing the different paths it can take depending on where the request originated from:
@Controller
@RequestMapping("/blog")
public class BlogController {
    private final BlogService blogService;

    public BlogController(BlogService blogEntryService) {
        this.blogService = blogEntryService;
    }

    void populateBlogDashboardModel(Model model, String categoryName, String categoryDescription) {
        model.addAttribute("title", "Blog | Shawn Osborne");
        model.addAttribute("metaDesc", "A software engineer's personal blog where he talks about technology and life. By Shawn Osborne.");
        model.addAttribute("categoryName", categoryName);    // used for dynamic heading of 'all-posts' fragment with category filter
        model.addAttribute("categoryDesc", categoryDescription);
    }

    void setToken(HttpServletRequest request) {
        // instantiates deferred CSRF token.
        CsrfToken token = (CsrfToken) request.getAttribute("_csrf");
        if (token != null) {
            token.getToken();
        }
    }

    @GetMapping
    Object blogDashboardView(Model model, HtmxResponse htmxResponse, HttpServletRequest request) {
        this.populateBlogDashboardModel(model, "All", "");
        model.addAttribute("posts", blogService.findAllSimpleBlogEntries());
        model.addAttribute("categories", blogService.findAllSimpleCategories());

        // resolve session and populate CSRF token
        this.setToken(request);

        if (request.getHeader("HX-Request") == null) {
            // for refresh or direct to /blog
            model.addAttribute("fromBlog", true);
            return "blog";
        }

        String currUrl = request.getHeader("HX-Current-URL");
        if (currUrl == null || !currUrl.endsWith("/blog")) {
            htmxResponse.setPushUrl("/blog");
        }

        // for htmx request
        return FragmentsRendering
                .fragment("components/shared-head::head-title")
                .fragment("blog::blog-main")
                .build();
    }
}
Here's what happens when this endpoint's method is called:
- The
modelis populated with information setToken()is called to set or create a session so the CSRF token is resolved (by default, it is deferred on anonymous visitors, but this is where user input is possible, so it is necessary)- Checks if the
HX-Requestheader istrueto either send the full page or HTML fragment. - If it is an HTMX request, it sets the current URL to /blog if it isn't already
- Finally, renders and responds with the full-page or fragments needed in the swap.
Then, there are other endpoints that are structured to allow only HTMX to make the request, since it wouldn't make sense for a fragment to be stand-alone. One example of that is in the CommentController:
Example of the endpoint /comment/replies?parentId={id}&entryId={id} and its Class:
@Controller
@RequestMapping("/comment")
public class CommentController {
    private final CommentService commentService;

    public CommentController(CommentService commentService) {
        this.commentService = commentService;
    }

    @HxRequest
    @GetMapping("/replies")
    String replyComments(Model model, @RequestParam Integer parentId, @RequestParam Integer entryId) {
        model.addAttribute("replyComments", commentService.getReplyCommentsByParentId(parentId, entryId));
        model.addAttribute("parentId", parentId);
        return "components/comment-components::comment-replies";
    }
}
The order of operations for that endpoint are:
@HxRequestis one of several helpers I used from Wim Deblauwe's library for HTMX + Thymeleaf, which restricts the endpoint only to match requests if they came from HTMX.modelis populated with found reply comments and the parent's ID.- Then, the
comment-repliesfragment from thecomponents/comment-componentstemplate is rendered and sent to the browser.
All endpoints follow one of these structures, depending on their purpose.
Thymeleaf + HTMX
Thymeleaf and HTMX work together to enable dynamic page updates to server-rendered HTML. Small components or fragments rendered with Thymeleaf are swapped for specific HTML elements using HTMX's built-in AJAX, allowing asynchronous updates without full-page reloads.
In a standard Thymeleaf-rendered application, a page is built using various template fragments declared with th:fragment, which are combined using th:replace to create a full page. Interaction requires a new page to be sent with each request.
Example of standard Thymeleaf
...In the main template 'index.html'
<main>
    <header th:replace="fragments/page :: header"></header>
    <section th:replace="fragments/page :: content"></section>
</main>
... The fragment definition in 'fragments/page.html'
<header th:fragment=”header”>
   <h1>My Website</h1>
       ... other header content
</header>
<section th:fragment=”content”>
    <div>
       ... section content
    </div>
</section>
When the template index.html is rendered by Thymeleaf, the <header> and <section> elements will be replaced with the fragments defined in fragments/page.html.
If Thymeleaf is enhanced with HTMX, a user action (e.g., a button click or form submission) triggers an HTMX/AJAX request. When the controller handles that request, it prepares the model, and Thymeleaf renders the required fragment(s). After the client receives the response, HTMX uses attributes declared in the original document to decide where to inject the new element(s) on the page, creating that single-page feel.
Example of HTMX enhanced Thymeleaf
… Initial full-page load requires standard Thymeleaf as show above, but now with HTMX attributes
<main>
    <header th:replace="fragments/page :: header" id=”header”></header>
    <section th:replace="fragments/page :: content" id=”content”></section>
    <button hx-get=”/header” hx-target=”#header” hx-swap=”outerHTML”>Update Header</button>
    <button hx-get=”/content” hx-target=”#content” hx-swap=”outerHTML”>Update Content</button>
</main>
The above example shows a simple way to declare and use HTMX. As you can see, the elements to be swapped require an id or class attribute to target with hx-target, and the interactive element can fetch the new content via hx-get. The hx-swap attribute tells HTMX how to swap the new element using standard DOM naming conventions (e.g., innerHTML, outerHTML, textContent).
There are many more patterns and uses for the library which can be found here.
JavaScript & CSS
I currently host two of my own custom JavaScript files and one large CSS file. I also host a third-party open-source JavaScript library for code highlighting called highlight.js, which you have seen in action in the code blocks above.
My CSS is written with mobile-first in mind and is fully responsive. It handles a fair amount of the site’s interactions on its own, e.g., visible state changes, open/closed toggles, transitions based on htmx-swapping, etc... HTMX classes are hooked into CSS transitions, so content fades out during a swap and back in once the new fragment lands, without any custom JS driving the animation.
The two custom JavaScript files I wrote handle the interactivity that HTMX and CSS don’t cover: DOM manipulation, network requests, and dynamic content generation.
sidebar.js builds the table of contents from the article’s headings (h2s and nested h3s), as you can see on the right side of the page. It uses the IntersectionObserver API to highlight the current section in the sidebar as the reader scrolls the page.
main.js handles a handful of smaller, somewhat unrelated pieces, which are:
- Injecting the CSRF token into every HTMX request header
- Refreshing that token after a successful login
- Dynamic updates to comment cards for edit and delete buttons
- Toggling different classes for CSS-based state changes
- Toggling the login modal and the navigation bar on mobile
- Converting UTC timestamps from the server to a readable local date and time
Application Security
Spring Security handles most of the application security the way it would in any standard Spring Boot app. A filter chain in front of every request, form-based login, sessions, and CSRF protection on form submission. All very boilerplate and configuration-based. A few pieces did need custom behavior to fit with how I modeled registration flow and comment ownership, though.
Authorization is role-based. Admin-only routes (post & category management) require ADMIN authority, commenting requires an authenticated and email-verified user, and everything else is public. A custom UserDetailsService builds the authorities directly from the role enum on the users table; ADMIN roles are also granted USER, so a separate hierarchy bean is not needed.
The default DaoAuthenticationProvider checks if the account is enabled before verifying the password. Here, the password verification happens before the account-enabled check, not after:
Overridden DaoAuthenticationProvider
@Bean
public AuthenticationProvider passwordFirstDaoProvider(BlogSystemUserDetailsService userDetailsService, PasswordEncoder passwordEncoder) {
    DaoAuthenticationProvider provider = new DaoAuthenticationProvider(userDetailsService);
    provider.setPasswordEncoder(passwordEncoder);
    provider.setPreAuthenticationChecks(_ -> {});
    provider.setPostAuthenticationChecks(user -> {
        if (!user.isEnabled())
            throw new DisabledException("Account not verified");
    });
    return provider;
}
The reasoning behind this behavior: a login attempt against an unverified account would fail before the password is checked. Checking the password first means an incorrect password fails the same way every time, email verified or not. Only a correct password can trigger the “verify your email” path. I am not using expired or locked account statuses at the moment.
The verification-pending path is handled by a custom LoginFailureHandler. Its purpose is to distinguish between a DisabledException (right password, unverified email) and an ordinary bad-credentials exception. If the username/password combination is correct, and the user has not validated their email, the session is invalidated, a fresh one is started, and the valid username is stored in the new session. Allowing the OTP entry modal to know who it’s verifying.
LoginFailureHandler
@Component
public class LoginFailureHandler extends SimpleUrlAuthenticationFailureHandler {

    @Override
    public void onAuthenticationFailure(HttpServletRequest request, HttpServletResponse response,
                                        AuthenticationException ex) throws IOException, ServletException {

        if (ex instanceof DisabledException) {
            String username = request.getParameter("username");
            HttpSession oldSession = request.getSession(false);
            if (oldSession != null) {
                oldSession.invalidate();
            }
            SecurityContextHolder.clearContext();
            HttpSession newSession = request.getSession(true);
            newSession.setAttribute("PENDING_VERIFICATION_USER", username);
        } else {
            HttpSession session = request.getSession(false);
            if (session != null) {
                session.removeAttribute("PENDING_VERIFICATION_USER");
            }
        }

        super.setDefaultFailureUrl("https://" + request.getServerName() + "/loginError");
        super.onAuthenticationFailure(request, response, ex);
    }
}
Registration and OTP verification live in RegistrationService. When a user registers, the service hashes their password, generates a 6-digit OTP, and emails the code via my EmailService. Verification is just a comparison of the submitted code against the stored (hashed) one, if the code hasn’t expired.
Testing
Since one of my early requirements was to avoid an ORM and hand write SQL, I needed to heavily utilize integration testing for the DAO layer. Each DAO test class uses @JdbcTest with TestContainers to spin up a real MariaDB instance per test run, which is seeded from the same production schema and a fixed set of data.
**Example DAO test that verifies the reply count subquery from earlier:
@Test
public void testFindAllParentCommentsByPostId() {
    List<Comment> result = commentDao.getParentCommentsByPostId(1);

    Assertions.assertFalse(result.isEmpty());
    Assertions.assertEquals(3, result.size());
    Assertions.assertEquals("Test Comment on Test Post 1", result.getFirst().getContent());
    Assertions.assertEquals(2, result.getFirst().getReplyCount());
}
The getReplyCount() assertion is confirming the subquery’s LEFT JOIN and GROUP BY behavior.
Since cascading deletes are enforced at the database level via foreign keys rather than in the application's code, they need the same treatment.
Deleting a blog entry should take its category joins and comments with it
@Test
@Transactional
public void testDeleteBlogEntry() {
    BlogEntry blogEntry = blogEntryDao.findById(1).orElse(null);
    assertNotNull(blogEntry);
    int deleted = blogEntryDao.deleteById(blogEntry.getId());
    assertEquals(1, deleted);
    blogEntry = blogEntryDao.findById(1).orElse(null);
    assertNull(blogEntry);

    //Ensure category joins and related comments are cascade deleted
    List<Integer> categoriesWithId = jdbc.sql("SELECT category_id FROM posts_categories WHERE post_id = 1").query(Integer.class).list();
    assertEquals(0, categoriesWithId.size());

    List<Comment> commentsWithId = jdbc.sql("SELECT * FROM comments WHERE post_id = 1").query(Comment.class).list();
    assertEquals(0, commentsWithId.size());
}
@Transactional is used to roll-back the data to not interfere with the remaining tests.
Not every DAO method needs this level of scrutiny. The insert/update/find calls that are just wiring are mainly tested to confirm the round trip works and edge cases (non-existent IDs, duplicate unique keys) fail the way I expect.
Unit tests are reserved for methods with logic to isolate, not just wiring DAO calls or building objects. RegistrationService.verifyUser() for example, has real branching featuring the EXPIRED, INVALID, and VALID values from the VerificationStatus enum. It is tested with Mockito to mock DAO results:
@Test
void verifyUserExpiredOtp() {
    Instant timeToExpiry = Instant.now().minusSeconds(10);
    when(appUserDao.getOtpDetailsByUsername(anyString())).thenReturn(new Object[]{1, encodedOtp, timeToExpiry});
    VerificationStatus verificationStatus = registrationService.verifyUser("Test User", String.valueOf(123456));

    assertEquals(VerificationStatus.EXPIRED, verificationStatus);
}
BlogService’s methods that require role awareness are also tested using a mocked Authentication object to simulate the authenticated roles without needing Spring Security to run.
Example of setup and teardown with unit test ensuring in-progress posts are only readable by an ADMIN role
@AfterEach
void tearDown() {
    SecurityContextHolder.clearContext();
    inProgressEntry = new BlogEntry();
}

private static void setAuth(String role) {
    UsernamePasswordAuthenticationToken auth = new UsernamePasswordAuthenticationToken(
            "testuser",
            null,
            List.of(new SimpleGrantedAuthority(role))
    );
    SecurityContextHolder.getContext().setAuthentication(auth);
}

@Test
void testReadPostById_throwInProgress() {
    setAuth("USER");
    inProgressEntry.setInProgress(true);
    when(blogEntryDao.findById(anyInt())).thenReturn(Optional.of(inProgressEntry));
    Exception ex = Assertions.assertThrows(BlogEntryException.class, () ->
            blogEntryService.readPost(1));
    Assertions.assertEquals("Entry is in progress and cannot be read!", ex.getMessage());
}
Infrastructure Layer
My infrastructure requirement was to run the Spring application with MariaDB on a single AWS EC2 instance. Which was part technical choice, part a chance to use the AWS Cloud Practitioner certification I'd gotten but hadn't practiced much yet.
While researching the rest of the Infrastructure stack, I found that CloudFront's newer flat-rate pricing model has a free tier that covers nearly everything the project needs in one bundle:
- CDN delivery with edge caching
- WAF, DdoS protection, & IP based rate limiting
- Route 53 DNS & TLS certificate
On top of that, it includes 5GB of S3 credits, 1 million requests, and 100GB of data transfer per month, and unlimited DNS queries to ALIAS records (I'm using two: the root domain for EC2 and a CDN domain for S3).
Cloud Architecture Diagram

Deployment
My deployment is intentionally simple. With just a single EC2 instance and me being the sole developer, I don't need a full CI/CD pipeline. My deployment flow goes: package the .jar with Maven (this verifies compilation and runs tests), copy the .jar to the instance with scp, then run a small bash script on the server to move the .jar to its locked directory. The .env file gets the same treatment.
Bash script for moving and locking .jar and .env files
#!/bin/bash

systemctl stop application
sleep 5s

mv /home/user/app.jar /opt/spring/application.jar
chown -R appuser:appuser /opt/spring
chmod 700 /opt/spring
chmod 500 /opt/spring/application.jar
chmod 600 /opt/spring/environment.env

systemctl start application
echo "app moved to secured directory.."
systemctl status application
journalctl -u application -f
The app runs under its own dedicated user with no shell access. The deploy script moves the jar out of the server's default home directory and gives ownership to appuser. Its locked directory: 700 owner access, 500 owner read/execute on the jar (should not be modified), and 600 owner read/write on the environment file. appuser is one layer among several isolation layers. Cloudfront sits in front of all HTTP traffic, SSH is restricted to only my IP, and the app connects to MariaDB over localhost only, the database is never even exposed to the network.
Systemd manages the process:
[Unit]
Description=Blog CMS Spring App
After=network.target mariadb.service

[Service]
User=appuser
EnvironmentFile=/opt/spring/environment.env
ExecStart=java -Xms256m -Xmx512m -jar /opt/spring/application.jar
SuccessExitStatus=143
Restart=always
RestartSec=10

[Install]
WantedBy=multi-user.target
The systemd configuration ensures the app waits for the database to start and defines the authorized user, environment, and start parameters. The JVM heap is capped at -Xmx512m with a -Xms256m starting point, to be conservative for the t4g.small instance, where MariaDB and the OS itself all share 2GB memory. MariaDB has also had its memory usage constrained by limiting its buffer pool size conservatively and setting it’s max connections to match the also-limited HikariCP connection pool in Spring.
The database schema is applied separately. The .sql file is also securely copied with scp to the server and imported directly within the MariaDB command-line client with the < redirection operator (e.g., mariadb blogdb < schema.sql). Since the schema will not change frequently, if at all, it's simple enough to not require something like Liquibase or Flyway.
For static assets, I am currently just using the AWS browser console to drag files and drop them into the S3 bucket’s file system. In the near future, I plan to implement an S3 service in Spring to help me do that from my UI.
What's Next
- AWS SDK for S3 uploads
- Forgot Password & Change Password Flow
- Scheduled Database Backup
- Retrospective
Comments